


Are you looking for the best way to add social media icons to WordPress menus? If you do, we have the solution for you.
Integrating social media icons into your site’s menus enhances engagement with your audience across social platforms, i.e., Facebook, YouTube, and more.
In this guide, we will explain a simple and effective method to help you add social media icons to your WordPress menus.
Let’s begin!
Table of Contents
What are Social Media Icons for WordPress Menus?
Social media icons for WordPress menus let you present your various social media platforms to the audience.
These icons help you link your social media profiles to your WordPress menus allowing visitors to easily connect with you or your business on different social media platforms.
This is the best way to grow your online community, increase brand awareness, and drive traffic to your social media profiles.
Why Should You Add Social Media Icons to WordPress Menu?
If you’re running a WordPress site, adding social icons to your menu can significantly enhance your site’s functionality and user experience.
Here’s why you should consider using social icons in your WordPress menu:
- Enhanced Visibility and Accessibility: Social icons in your WordPress menu make your social media profiles noticeable and accessible to your website visitors. This is the best way to encourage users to connect with your social media profiles, i.e., Facebook, YouTube, and more.
- Consistent Branding: You can maintain a consistent visual identity throughout your site by integrating social icons into your menu.
- Boost Social Engagement: Adding social icons to your WordPress menus will lead to higher social media engagement.
- Community Building: These icons will help you build a loyal community around your brand.
- Cross-Promotion Opportunities: Integrating social icons in your WordPress menu allows you to cross-promote your various social media profiles.
Adding Social Media Icons to WordPress Menus Using Plugin
Many WordPress themes come with built-in options to include social media icons in the menu, or you can use plugins specifically designed for adding social media icons to menus. These plugins often allow you to customize the appearance and placement of the icons within your menu.
However, we’ll show you how to add social media icons to your menu using a social media icons plugin for WordPress.
Step 1: Install and Activate Menu Image Plugin
The first thing you’ll need to do is install the Menu Image plugin in your WordPress.
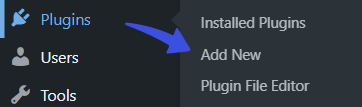
To do this, go to the left sidebar of the WordPress admin dashboard, navigate to Plugins, and click the Add New option.

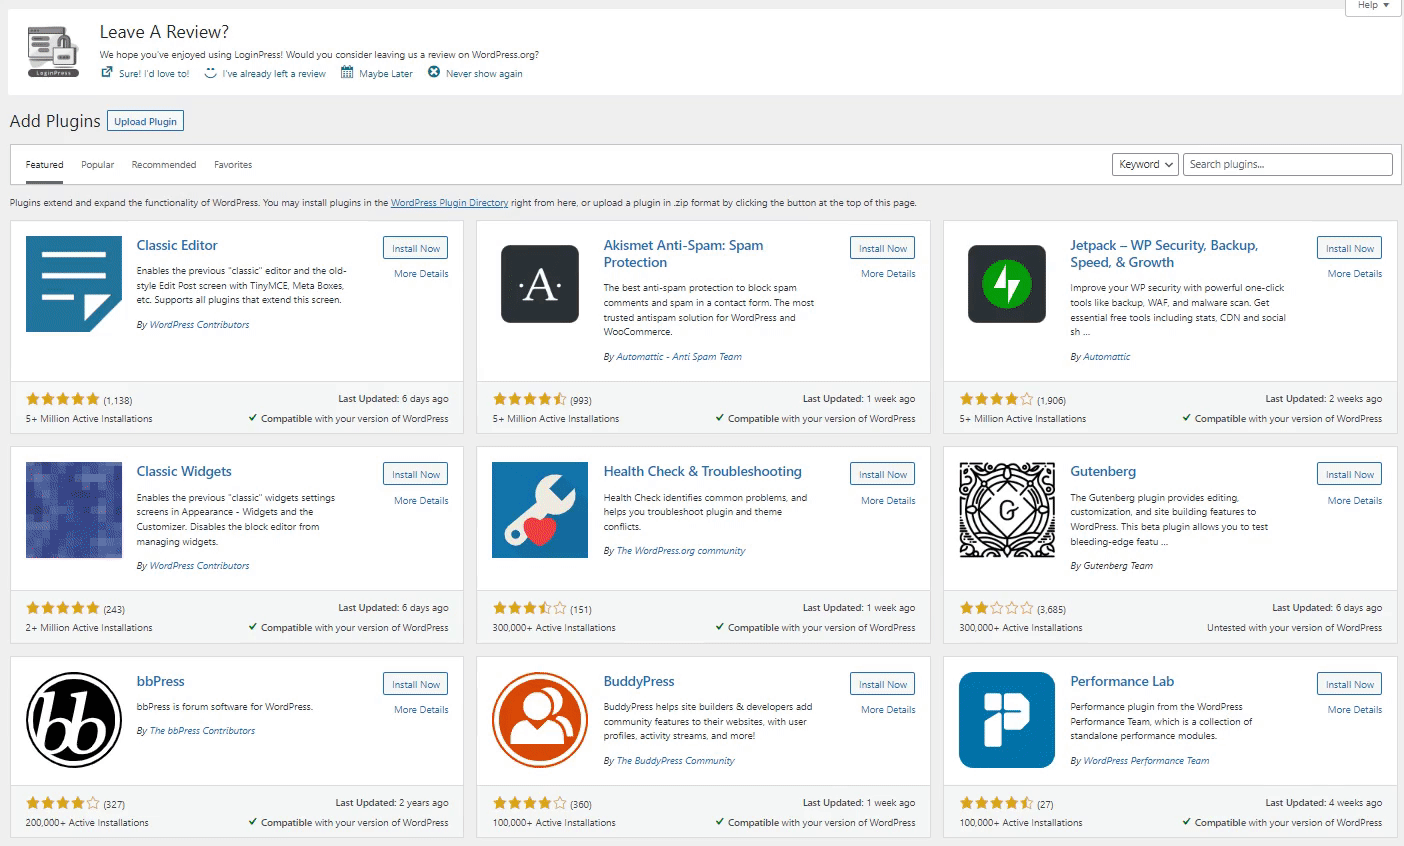
On the Next screen, search for the plugin in the search field. Find the plugin from the search results, click Install Now, and then Activate button.

The Menu Image plugin is added to your WordPress.
Note: Menu Image integrates with the Font Awesome plugin. The combo will allow you to add social icons, i.e., Twitter, Facebook, LinkedIn, Google, and more, directly from the WordPress dashboard. So, we’ll recommend installing the FontAwesome plugin with the Menu Image.
You can set image size, i.e., width and height, from the Menu Image Settings for your uploaded items.
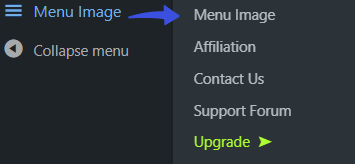
For this purpose, go to the left sidebar of the WordPress admin dashboard, navigate to Menu Image, and click the Menu Image option.

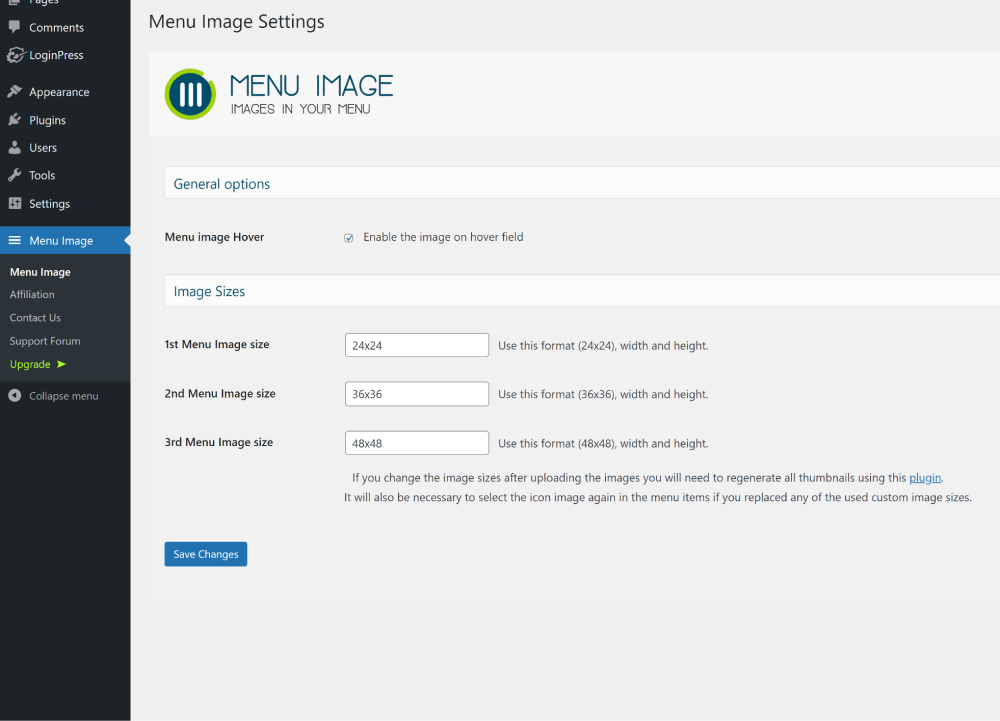
On the next screen, set three different Menu Images Sizes, i.e., 24×24, 36×36, and 48×48 pixels by default for your uploaded images.

Step 2: Create a Menu
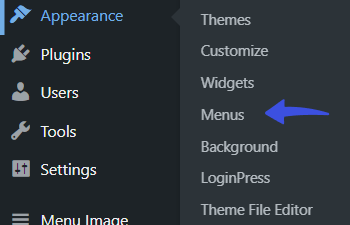
Now, go to WordPress admin dashboard > Appearance > and click the Menus option.
Note: Menus option doesn’t work with a block theme. So, if you don’t find the Menus option in Appearance, you’ll need to select any compatible theme, i.e., Twenty Twenty, Twenty Twenty-one, etc.

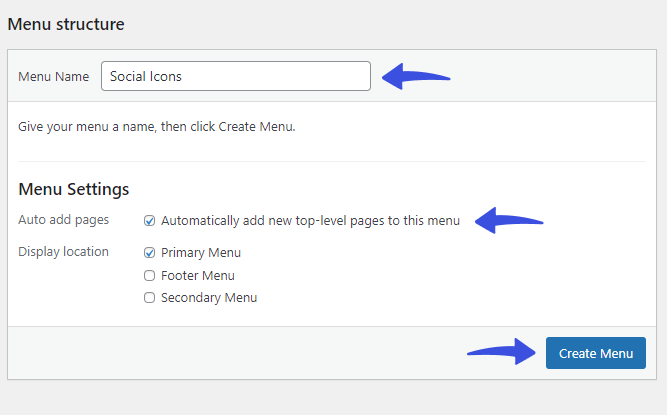
Menus screen will open up. Now, you’ll need to create a menu first of all. Simply type the menu’s name in the Menu Name field, tickmark the Menu Settings checkbox, and click the Create Menu button.
Note: In case you already have created Menus, select the desired one.

Step 3: Create a Custom Link
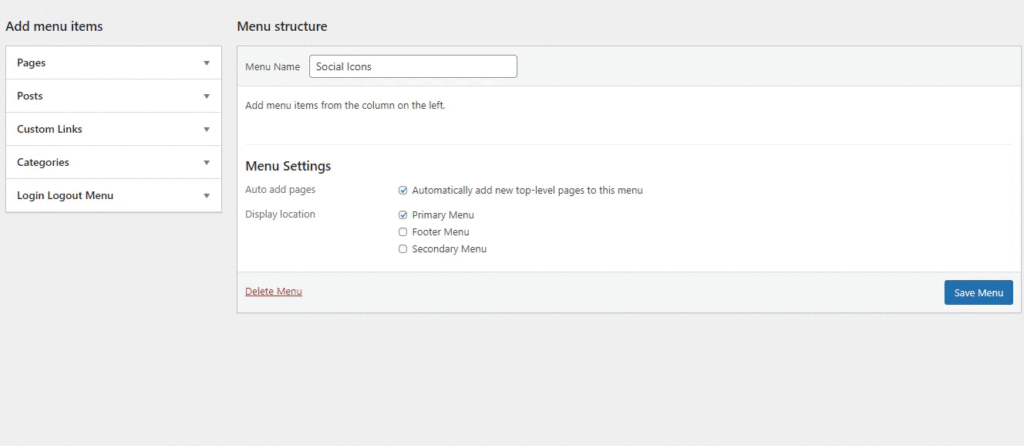
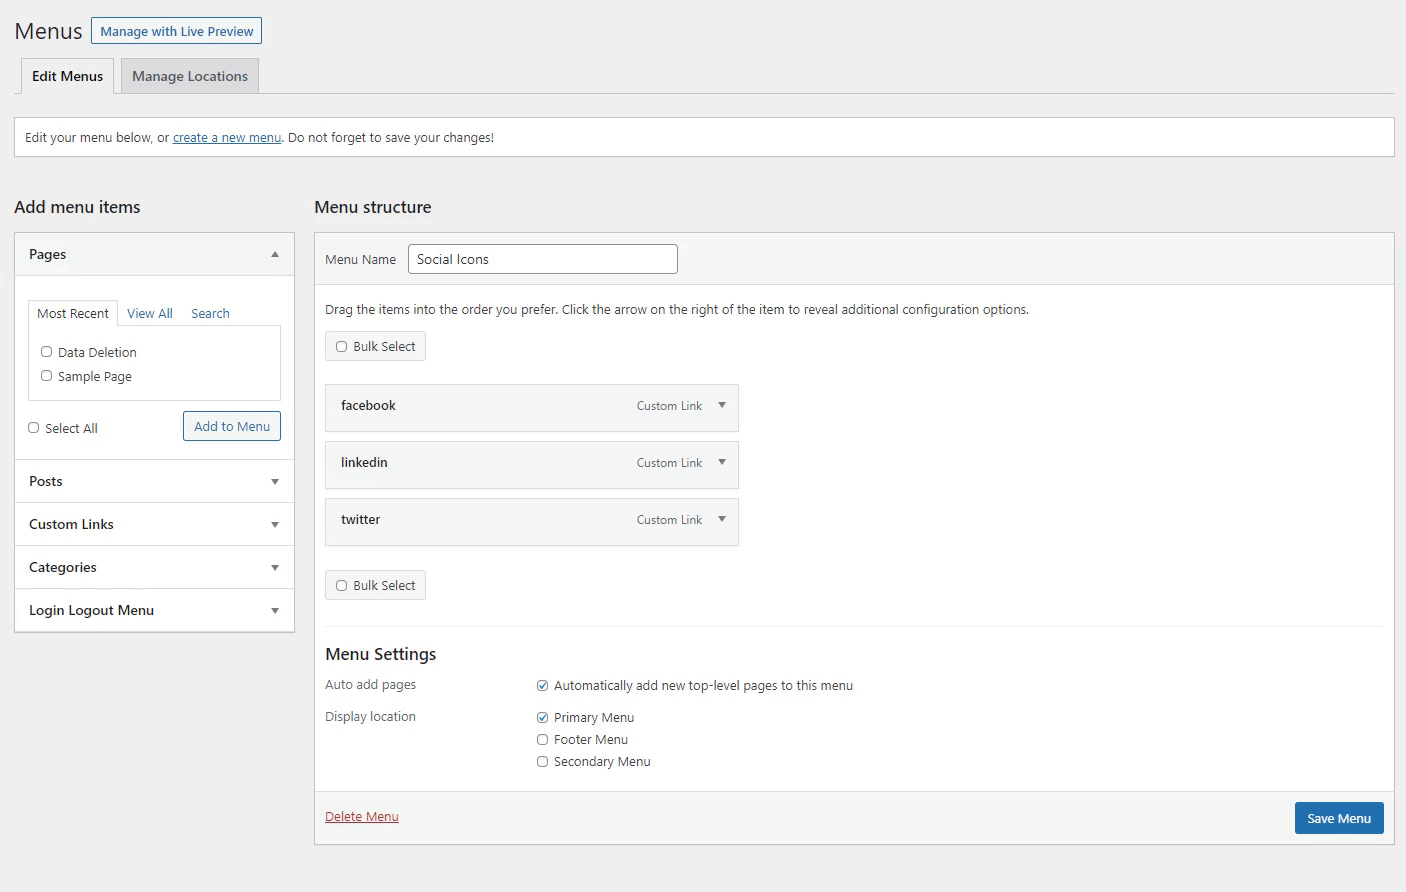
Next, you can see that the Add menu items option is enabled. You’ll require to click on the Custom Links drop-down menu.
Now, paste the URL of the social media page, i.e., Facebook, LinkedIn, Twitter, and more; you want to use and add a suitable label.

Step 4: Add Social Icon in the Custom Link
Now, hover over the new menu item, and click the Menu Image button when it appears.
A popup with Menu Image settings will open up.

From here, you can select:
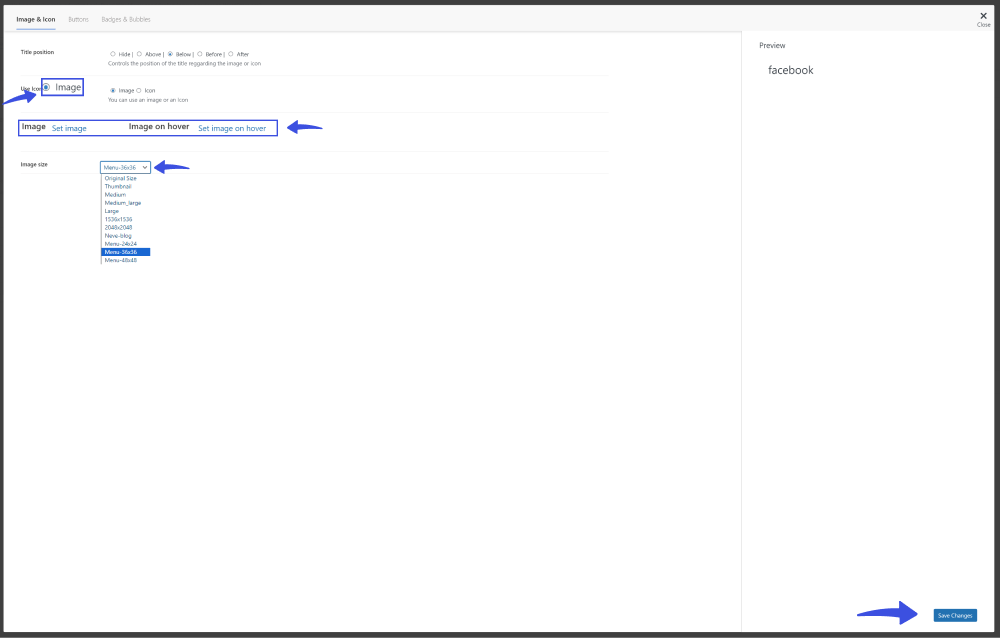
4.1. Title position:
You can use this option to control the position of the title regarding the image or icon, i.e., Hide, Above, Below, Before, and After.


Note: The label will appear with the icon, so if you want only the icon without a label in your menu, then select the Hide option.
4.2. Use Icon/image:
The plugin lets you choose between icons provided by Font Awesome or Image.

4.2.1. Image:
Selecting the Image option will enable you to select images for your social platforms.
In addition, you can add an Image on the hover and select the image size from the Image Size’s drop-down menu.
Note: The menu image will show a preview on the right.

4.2.2. Icon:
Dashicon and Fontawesome options will open if you select the icon option.
Note: We assume you’ve already installed the Font Awesome plugin in your WordPress.
Simply select the Fontawesome > Brands tab > select the brand icon, i.e., in our case Facebook.

When done, click the Save Changes button.
Note: You can add icons to other important items in the navigation menu. For more understanding, see a detailed guide on How to Create Login Logout Menu with LoginPress (Free).
Step 5: See the Result
All done! Now, you can visit your WordPress site to see the new social media icons.
See the image below to learn how it looks on your site:

Final Thoughts
Now that you know adding social media icons directly into your WordPress menus enhances the aesthetic appeal of your WordPress site and helps you establish connectivity with your online presence.
Following this guide, you’ve unlocked a simple and efficient method to uplift your site’s social engagement. Embrace this newfound knowledge to infuse your website with the power of social connectivity.
That’s all! You can also check our detailed articles on How to Add CAPTCHA in WordPress Login and Registration Form (Easy Ways) and The Ultimate Comparison of the 7 Best WordPress Backup Plugins.
Frequently Asked Questions (FAQs)
Do I need any coding knowledge to use WordPress plugins?
No, you don’t need any coding knowledge to use WordPress plugins. These plugins are user-friendly and require little to no technical skills to integrate into your site.
Why should I add social media icons to my WordPress menu?
Adding social media icons to your WordPress site’s menu provides a quick way to connect with your social profiles. It helps you increase your online presence and engagement.
What is the easy way to add social media icons to WordPress menus?
The easy way to add social media icons to WordPress menus is using a Menu Image. This plugin allows you to integrate icons into your menu without any coding knowledge.
Can I rearrange the position of the social media icons in the menu?
Yes, you can rearrange the position of the social media icons in the menu. To do this, go to WordPress admin dashboard > Appearance > drag and drop the social media menu in your Menu. When you are done, click the Save Menu button.